
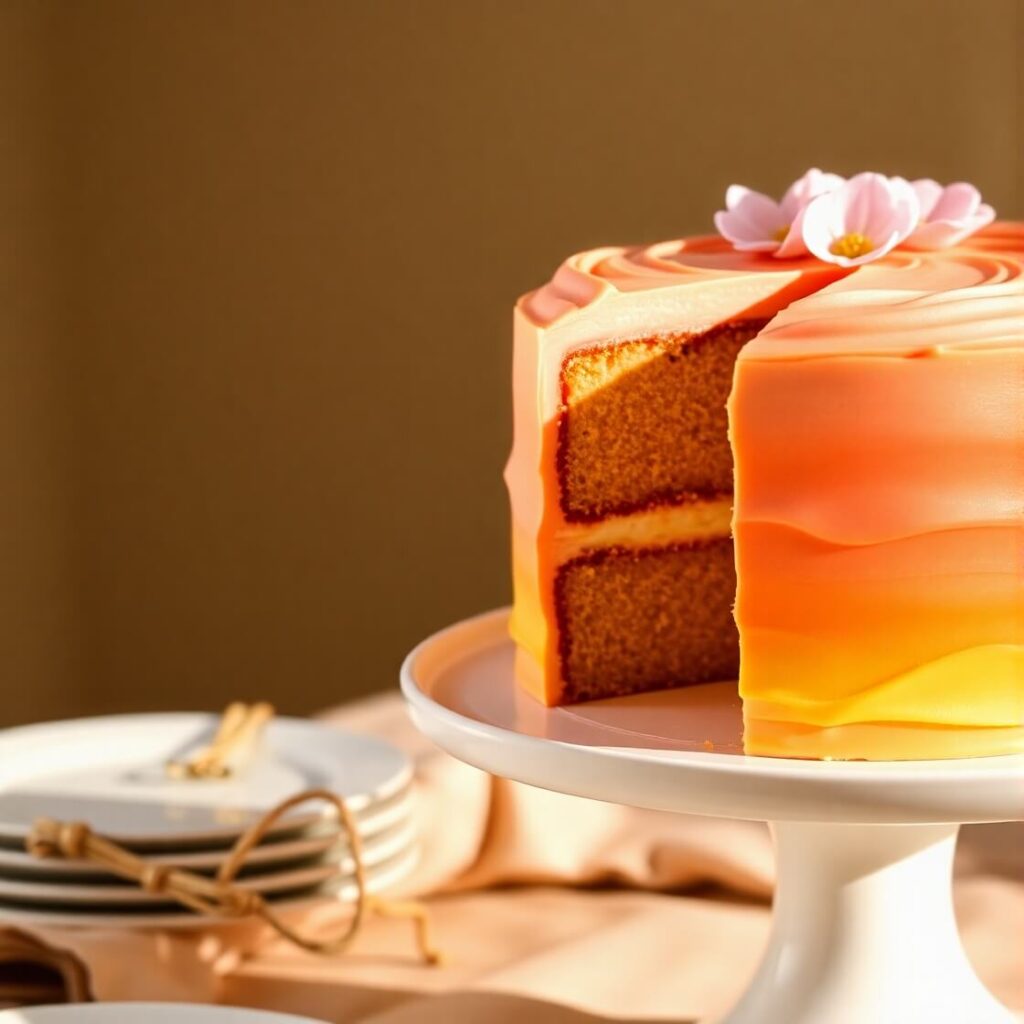
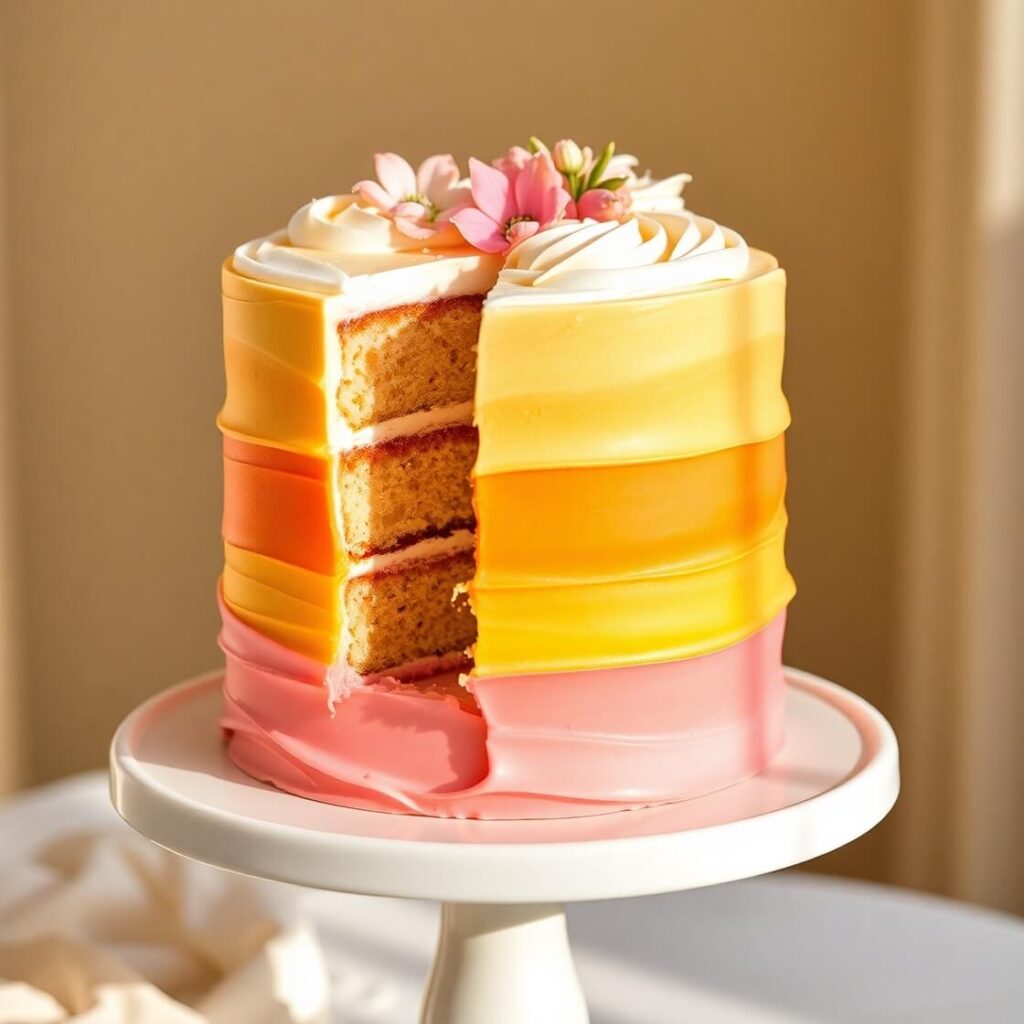
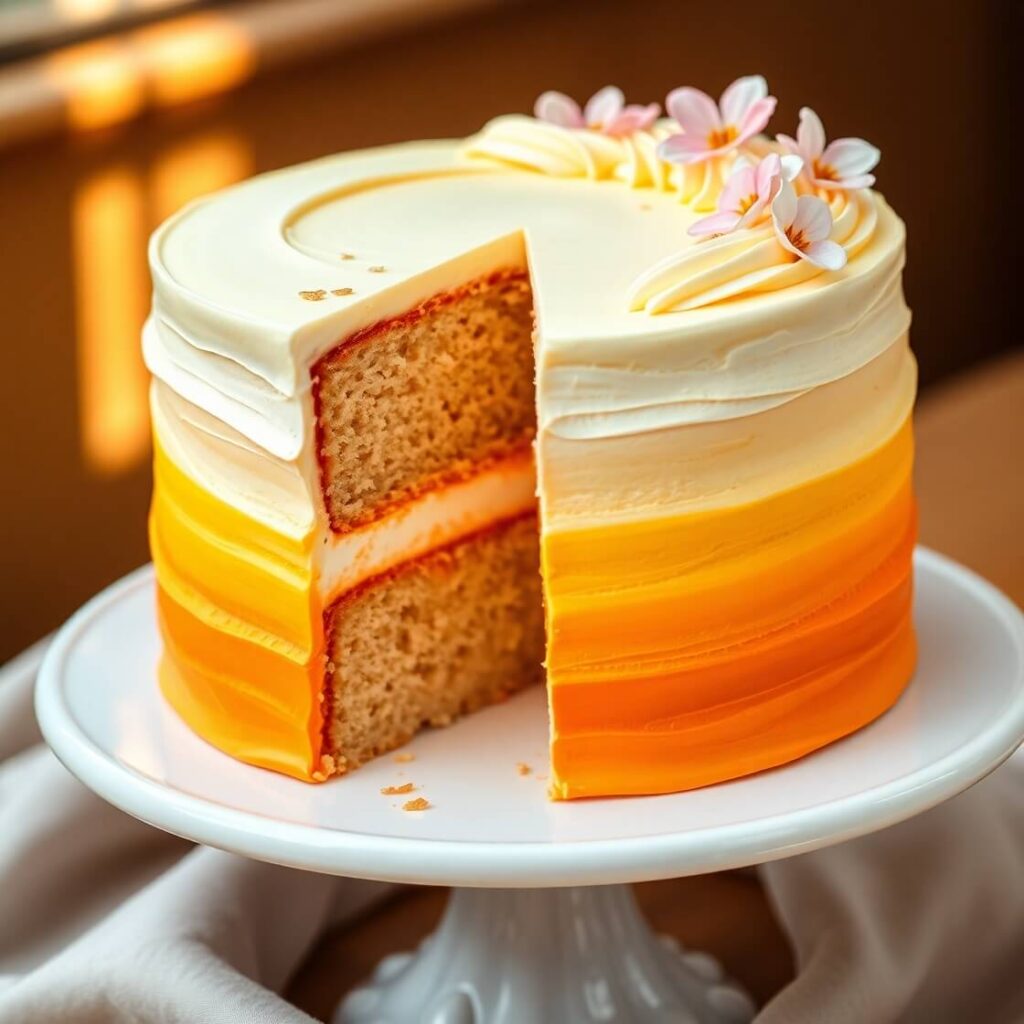
The first time I created this sunset cake, it was for a summer garden party—a celebration that began in the late afternoon and stretched into golden hour. I wanted a dessert that didn’t just taste like summer but looked like it too. Something that would stop guests mid-conversation and draw their eyes to the dessert table. That’s when I thought: why not create a cake that mimics the sky at sunset?
There’s something undeniably comforting and joyful about sunsets. They signal the end of a day, bring a soft stillness, and bathe everything in warm, peachy-orange hues. I imagined those colors layered in sponge form, frosted with gradients of pinks and oranges, swirled like the sky on a dreamy July evening.
This cake is more than just a visual statement—it’s a crowd-pleaser with tender, moist vanilla layers, a hint of citrus in the frosting, and an elegance perfect for birthdays, baby showers, or any occasion where you want the dessert to feel like a showstopper.
But this cake isn’t hard to make. With the right steps, anyone—from casual baker to experienced dessert enthusiast—can recreate the sunset sky in cake form.
Why I Love This Recipe
The sunset cake is one of those rare recipes that merges artistry with approachability.
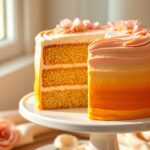
The first thing to love is the visual. The ombré effect on the outside, softly fading from golden yellow to orange to rose pink, gives it an ethereal beauty. You don’t need to be a professional baker to make it look impressive. A few tips with a spatula and gel coloring are all it takes.
Secondly, this cake is built on a base that’s deeply satisfying: a buttery vanilla cake that’s light yet moist, with a fine crumb that holds up beautifully to frosting and slicing. You can customize the flavor profile if you like, but the original—with its simple vanilla foundation and citrus buttercream—is like a classic sunset: warm, familiar, and comforting.
And then there’s the versatility. You can dress it up or down. Add floral decorations for a wedding shower, sprinkle edible glitter for a birthday, or leave it clean and minimalist. The recipe is adaptable, forgiving, and always beautiful.
Most of all, it’s the kind of cake that brings delight. It’s the cake that makes guests pause to take a picture, the one that gets remembered long after the last slice is gone.
Ingredients for Sunset Cake
To create a sunset cake, you need ingredients that strike a balance between flavor, texture, and color. The cake itself is a light vanilla sponge—airy yet rich. The buttercream brings tangy citrus notes to balance the sweetness and provide a clean canvas for coloring.
For the Cake Layers (3-tier 8-inch round pans):
- All-purpose flour – Gives the cake structure while keeping the crumb tender
- Baking powder – Provides lift and airiness
- Salt – Enhances the sweetness and balances flavor
- Unsalted butter – Creamed with sugar for richness and moisture
- Granulated sugar – Sweetens and aerates the batter
- Eggs – Room temperature, adds structure and stability
- Whole milk – Adds moisture and richness
- Pure vanilla extract – The foundation of the cake’s flavor
- Vegetable oil – Helps keep the cake moist
- Optional: A drop of yellow food coloring for the middle layer (for a subtle internal ombré)
For the Sunset Buttercream:
- Unsalted butter – Softened for easier whipping
- Confectioners’ sugar – Adds sweetness and stiffness
- Heavy cream – Lightens and fluffs up the buttercream
- Fresh lemon zest – Adds brightness to balance the sugar
- Vanilla extract – Rounds out the flavor
- Gel food coloring – Yellow, orange, and pink (for that signature sunset swirl)
For Decoration (Optional):
- Edible gold leaf or shimmer dust
- Pressed edible flowers
- White chocolate shards or meringue kisses
How Much Time Will You Need?
Here’s the breakdown of time to help you plan ahead:
- Preparation time: 30 minutes
- Baking time: 25–30 minutes
- Cooling time: 1 hour
- Frosting and decorating: 45–60 minutes
Total time: Approximately 2.5 to 3 hours
If you’re planning for an event, bake the cake layers the night before and frost the day of for best results.
How to Make This Sunset Cake
Step 1: Preheat and Prepare
Preheat your oven to 350°F (175°C). Grease three 8-inch cake pans and line the bottoms with parchment paper. Lightly flour the sides to prevent sticking.
Step 2: Cream Butter and Sugar
In a large mixing bowl, cream together the unsalted butter and granulated sugar for about 3–4 minutes until light and fluffy. This step aerates the batter, giving your cake lift.
Step 3: Add Eggs One at a Time
Add the eggs, one at a time, mixing well after each addition. This helps incorporate air and maintain the emulsion of the batter.
Step 4: Mix in Vanilla and Oil
Stir in the vanilla extract and vegetable oil. The oil gives the cake its lasting moistness, even after refrigeration.
Step 5: Combine Dry Ingredients
In a separate bowl, whisk together the flour, baking powder, and salt. Gradually add the dry ingredients into the wet mixture, alternating with milk, starting and ending with dry. Mix just until incorporated—don’t overmix.
Step 6: Divide and Bake
Divide the batter evenly between the three prepared pans. If you want an internal color gradient, add a drop of yellow gel coloring to one layer before baking. Bake for 25–30 minutes, or until a toothpick inserted comes out clean.
Cool the layers in the pans for 10 minutes before transferring them to a wire rack to cool completely.
Step 7: Make the Buttercream
In a stand mixer or large bowl, beat the softened butter until pale and fluffy (about 4 minutes). Gradually add in the confectioners’ sugar. Add lemon zest, vanilla extract, and a few tablespoons of cream until you reach your desired consistency.
Divide the buttercream into three bowls. Tint each one with food gel: one pink, one orange, and one yellow.
Step 8: Assemble the Cake
Level your cooled cake layers with a serrated knife if necessary.
Place the first layer on a cake board or plate and spread a generous amount of buttercream on top. Repeat with the second and third layers.
Step 9: Frost and Swirl
Apply a crumb coat (a thin layer of frosting to trap crumbs) and chill the cake for 15 minutes.
Then, using your colored buttercreams, frost the cake starting from the bottom (yellow), then the middle (orange), and the top (pink). Blend the colors with an offset spatula in sweeping upward motions for a seamless ombré.
Step 10: Decorate
Add final touches—edible gold, flowers, or whatever fits your event.
6. Substitutions
- Butter: Swap with high-quality margarine or dairy-free butter for a lactose-free version.
- Milk: Use almond milk or oat milk in a 1:1 ratio for dairy-free.
- Eggs: Use a flaxseed egg or commercial egg replacer if making a vegan version.
- Lemon zest: Orange zest is a perfect substitute and still brings that citrus balance.
- Gel coloring: If unavailable, powdered natural colorants like beetroot, turmeric, and saffron can work in small amounts, though hues may be muted.
Best Side Dish of Sunset Cake
Pairing your sunset cake with the right side can elevate the entire dessert course. Here are three options to serve alongside:
- Citrus Mint Fruit Salad
Fresh, zesty, and lightly sweetened—balances out the richness of the cake. - Sparkling Raspberry Lemonade
A refreshing beverage to complement the light citrus notes in the frosting. - Vanilla Bean Ice Cream
A scoop of cold, creamy ice cream makes the warm sunset flavors shine.
Serving and Presentation Tips
A sunset cake isn’t just about taste—it’s about impact. You want your cake to look like the golden hour captured in edible form. Presentation plays a massive role in creating that wow moment.
Start with a clean white cake stand to let the colors shine. Frost the cake with smooth gradients—starting with yellow at the base, blending into orange, and finishing with pink at the top. Use an offset spatula to make wide upward swirls, mimicking the soft strokes of clouds in the sky.
Add finishing touches like edible gold leaf, tiny pressed flowers, or pearls at the seams between colors for a dreamy finish. If you’re serving at an outdoor party, set it in the center of a table with fresh citrus slices, whole lemons, or pink florals as décor around it.
Use a serrated knife to slice cleanly, and wipe the blade between cuts so each slice looks as gorgeous as the whole.
Tips and Tricks to Make This Recipe Even Better
Want your sunset cake to become the talk of the table? Try these tried-and-tested tips:
- Use gel food coloring, not liquid. Gel coloring provides bold, vibrant hues without watering down your buttercream or batter. It also gives you better control over ombré tones.
- Chill your layers before assembling. Cold cake layers are firmer and easier to frost without crumbling. You can even bake them a day ahead and refrigerate overnight.
- Whip your buttercream properly. Beat the butter for at least 4 minutes before adding sugar to ensure it’s light and fluffy. The result is a more airy, smooth frosting.
- Do a crumb coat first. A thin layer of frosting locks in crumbs so your final coat is silky smooth. Don’t skip this—it makes a big difference in appearance.
- Use a turntable. It makes frosting and blending colors much easier, especially if you’re aiming for that soft, swirling sunset effect.
Common Mistakes to Avoid**
Many bakers get tripped up by the same simple errors. Here’s what to watch out for:
- Overmixing the batter: This will create a dense, rubbery cake. Mix until just combined.
- Skipping the crumb coat: You’ll end up with a messy surface that’s hard to frost cleanly.
- Using too much food coloring: A little gel goes a long way. Oversaturating can make the buttercream taste artificial and stain fingers.
- Not leveling your cake layers: Uneven layers make the cake lean or bulge on one side. Use a serrated knife or cake leveler for clean results.
- Frosting warm cake layers: Always let them cool completely, or the buttercream will melt and slide.
How to Store It**
Proper storage keeps your sunset cake looking and tasting its best.
- Room Temperature: The cake can sit out for up to 6 hours if your room isn’t too hot. Cover loosely with a cake dome or foil.
- Refrigeration: For longer storage, refrigerate the cake in an airtight container or cover it tightly with plastic wrap. Bring it to room temperature before serving—this restores the frosting’s texture and flavor.
- Freezing: Freeze unfrosted cake layers wrapped in plastic and foil for up to 2 months. Thaw overnight in the fridge, then bring to room temperature before frosting.
If you have leftovers, individual slices can also be wrapped in parchment and frozen for later.
FAQ**
Q1: Can I make this cake ahead of time?
Yes! Bake the layers up to two days ahead. Store in the fridge wrapped in plastic wrap. Frost the day of your event for freshness.
Q2: Can I use natural food coloring?
Yes, but the shades will be softer. Beetroot powder (pink), turmeric (yellow), and carrot juice (orange) are decent natural options.
Q3: Can I make this gluten-free?
Absolutely. Swap the flour with a 1:1 gluten-free baking blend. Make sure your baking powder is gluten-free as well.
Q4: What flavor variations can I try?
Try adding lemon or orange zest to the cake batter, or use strawberry puree in the frosting for a fruity twist that still fits the sunset theme.
Q5: How do I get perfectly smooth frosting?
Chill the crumb-coated cake for 15–30 minutes, then apply the final layer of frosting using a bench scraper while slowly turning the cake on a turntable. This creates a clean, polished finish.
Sunset Cake
- Total Time: 3 hour
- Yield: Serves 12-16
- Diet: Vegetarian
Description
This sunset cake is a visual masterpiece and a delightful dessert all in one. With soft vanilla layers and a citrus-kissed buttercream, it’s perfect for birthdays, garden parties, or any celebration that deserves a centerpiece. The stunning ombré of yellow, orange, and pink mimics the sky at golden hour—making it both delicious and Instagram-worthy. Easy enough for a home baker and impressive enough for a formal event, this cake brings a little magic to every bite.
Ingredients
Cake Layers:
2 ¾ cups all-purpose flour
2 ½ tsp baking powder
½ tsp salt
1 cup unsalted butter (room temp)
1 ¾ cups granulated sugar
4 large eggs
1 tbsp vanilla extract
¼ cup vegetable oil
1 cup whole milk
Buttercream:
1 ½ cups unsalted butter (softened)
5–6 cups confectioners’ sugar
2–3 tbsp heavy cream
1 tsp vanilla extract
Zest of 1 lemon
Gel food coloring: pink, orange, yellow
Decoration (Optional):
Edible gold leaf
Pressed flowers
Citrus slices or edible shimmer
Instructions
- Preheat oven to 350°F. Grease and line three 8-inch cake pans.
- Cream butter and sugar until fluffy. Add eggs one at a time, then mix in vanilla and oil.
- Alternate adding flour mixture and milk to the wet ingredients. Mix just until smooth.
- Divide batter into pans and bake 25–30 minutes. Cool completely before frosting.
- For buttercream: beat butter until pale, add sugar gradually, then mix in lemon zest, vanilla, and cream.
- Divide frosting into three bowls. Tint with gel coloring.
- Stack and frost cake with crumb coat. Chill. Then apply colored frosting in ombré layers.
- Smooth and swirl colors using a spatula. Decorate as desired.
Notes
For best results, use gel food coloring.
Always chill the cake between frosting layers for clean lines.
If you’re decorating with flowers, make sure they’re food-safe and pesticide-free.
Level your cake layers for a more polished final look.
- Prep Time: 30 minutes
- Cook Time: 30 minutes
- Category: Dessert
- Method: Baking
- Cuisine: American
Nutrition
- Serving Size: 1 slice (1/14 cake)
- Calories: 530