
Every summer, as the days stretch longer and the sunshine warms everything it touches, I find myself drawn to the vibrant colors and juicy sweetness of fresh fruit. This Pretty Fruit Platter recipe was born out of a need to create something visually stunning, refreshing, and irresistibly delicious—without the stress of baking or cooking.
It’s the perfect centerpiece for brunch tables, garden parties, or even a quiet afternoon with your favorite book. And the best part? It’s deceptively simple. If you’ve ever wondered how to arrange fruit in a way that looks like it belongs on the cover of a magazine, you’re in the right place.
So, if you’re looking to impress without turning on the oven—or you just want a beautiful and healthy way to enjoy seasonal produce—this fruit platter is your go-to.
Let me show you how easy it is to turn fresh fruit into edible art.
Why I Love This Recipe
What makes this Pretty Fruit Platter so special isn’t just how it looks—it’s how it feels to serve it.
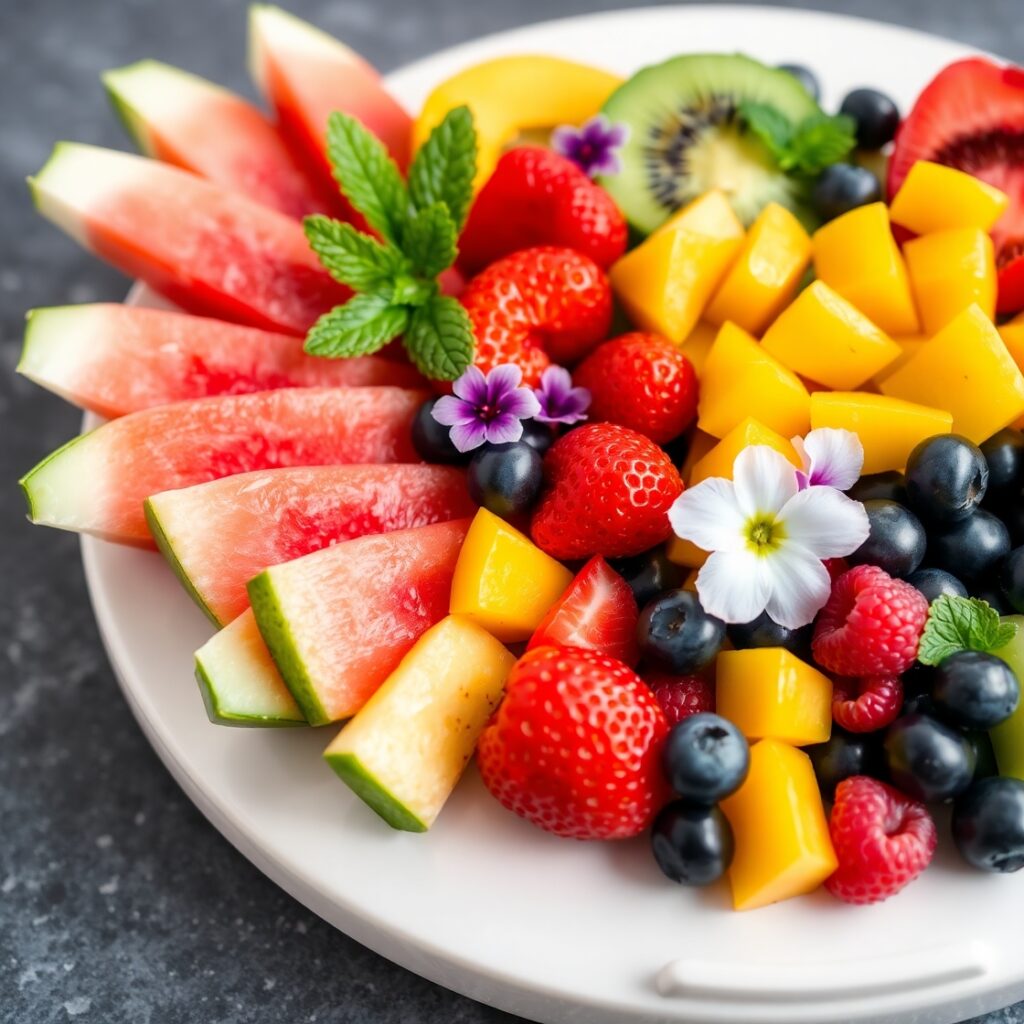
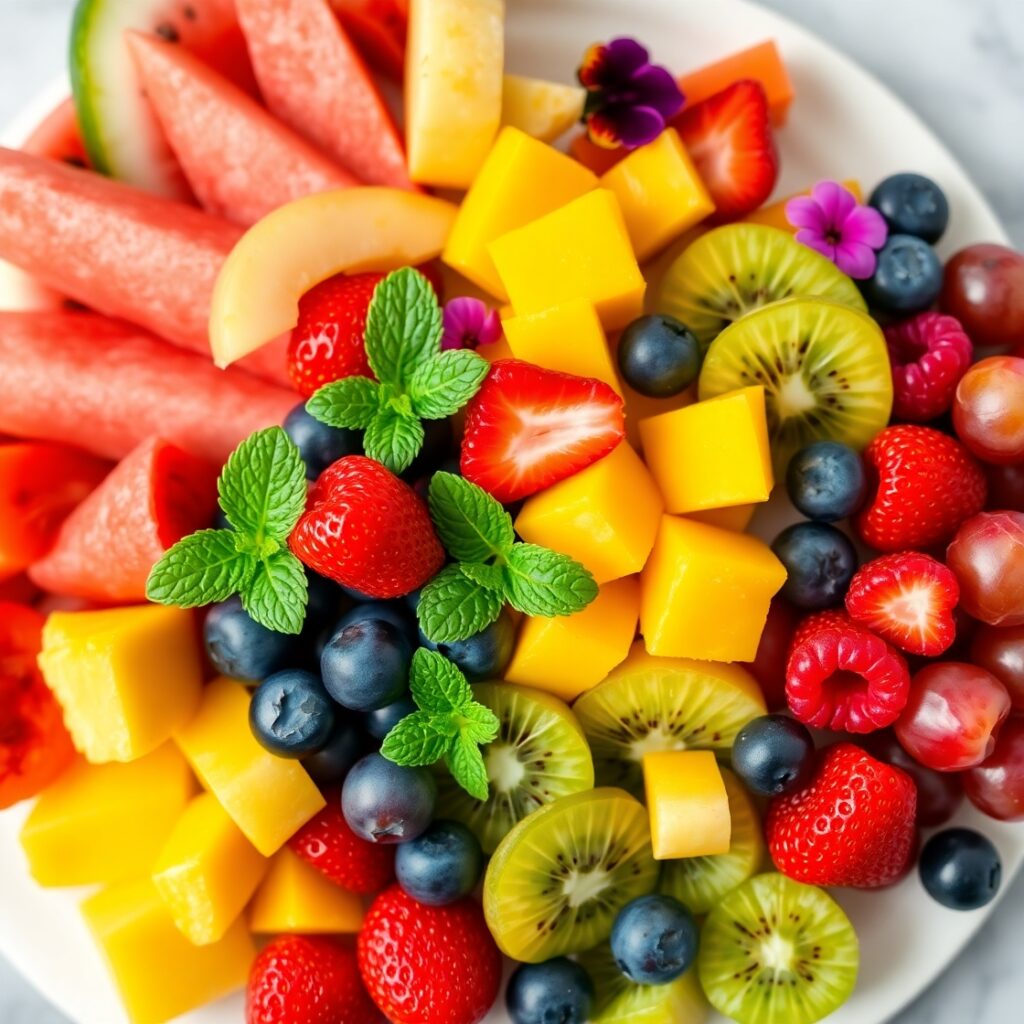
This is the kind of dish that sparks joy the moment you place it on the table. The colors pop, the textures invite touch, and there’s something for everyone. Whether it’s juicy watermelon, crisp green grapes, or soft ripe mango slices, every element offers a different taste and sensory experience.
There’s no cooking required—just a little knife work, some thoughtful arrangement, and a good eye for color and shape. It’s a celebration of nature’s beauty and a gentle reminder that sometimes, the simplest things are the most luxurious.
This platter is highly customizable, too. You can adapt it to suit dietary needs, seasonal availability, or even your event’s color scheme. It works equally well at a baby shower, wedding brunch, or casual weekend breakfast.
And beyond being visually impressive, this recipe is also a healthy choice. It’s loaded with vitamins, fiber, and natural sugars that provide energy without the heaviness of processed desserts.
Ingredients for Pretty Fruit Platter
To build a stunning fruit platter, variety is key—not just in flavor, but also in color, shape, and texture. Here’s how I approach it:
Base Fruits
These are the anchor fruits, often sliced or cubed, which help fill space and create structure:
- Watermelon (seedless, cut into triangles or cubes)
- Cantaloupe or honeydew melon (scooped into balls or sliced)
- Pineapple (cut into spears or rings)
Color Contrast Fruits
These add brightness and bold pops of color:
- Strawberries (halved or whole with stems on)
- Kiwi (peeled and sliced into rounds)
- Mango (sliced into thin fans)
Accent Fruits
Use smaller fruits to fill gaps and add detail:
- Blueberries
- Raspberries
- Blackberries
- Green and red grapes (left on the vine for visual interest)
Special Touches (Optional but Elegant)
These elevate your platter and make it feel curated:
- Edible flowers (like pansies or nasturtiums)
- Fresh mint leaves
- Coconut flakes or a sprinkle of chili-lime salt (Tajín) for a spicy twist
- Small bowl of honey, yogurt dip, or dark chocolate sauce on the side
Always aim for a balance between sweet and tart, soft and crunchy, and warm and cool tones to make the display both beautiful and satisfying.
How Much Time Will You Need?
One of the best parts about making a Pretty Fruit Platter is how flexible it is in terms of time.
You’ll need about 25 to 35 minutes to wash, peel, slice, and arrange the fruit. This can vary depending on how many types you’re using and how detailed you want the design to be.
If you’re making it for a large group or going for an elaborate presentation, allow up to 45 minutes so you don’t feel rushed.
You can also prep most of the fruit ahead of time and assemble the platter just before serving.
How to Make This Pretty Fruit Platter
Here’s a step-by-step guide to turning your produce into a gorgeous arrangement that feels just as special as it looks.
Step – 1: Choose Your Serving Board
Pick a large, flat surface—like a wooden charcuterie board, slate tile, or oversized serving tray. Make sure it’s food-safe and easy to transport. If you’re serving a crowd, consider using a rimmed baking sheet lined with parchment.
Step – 2: Wash and Dry All Your Fruit
Use cold water to rinse each fruit thoroughly. Dry them completely with a paper towel or clean kitchen cloth. Moisture can make the fruit soggy or cause it to slide around.
For berries, wash gently and lay them on paper towels to dry fully.
Step – 3: Prep the Larger Fruits
Slice your watermelon into triangles or cubes, scoop your melons with a melon baller, and peel and slice pineapple into spears or rounds. Fan mango slices or dice them in the grid-cut style for texture.
Keep shapes varied—this helps with visual layering later.
Step – 4: Slice and Style the Medium Fruits
Halve strawberries with stems intact for a rustic look. Slice kiwi into thin wheels. Peel oranges or clementines and break them into segments for easy picking.
Use odd numbers—groups of 3 or 5 tend to look more natural.
Step – 5: Fill in with Small Accent Fruits
Drop clusters of grapes between the larger pieces. Sprinkle raspberries and blueberries in corners or small open areas. These fill space and add rich color contrast.
Keep fruits close together—it should feel abundant, not sparse.
Step – 6: Garnish and Add Finishing Touches
Nestle mint leaves between fruits for a pop of green and a hint of fragrance. Add edible flowers if using, and place any small dip bowls or sauces around the edges.
If you’re including dips, use small ramekins or bowls so they don’t overpower the fruit.
Step back and assess. Adjust shapes, colors, and spacing to balance the composition before serving.
Substitutions
The beauty of a fruit platter is how adaptable it is. You can swap or skip ingredients based on availability, season, or dietary needs.
If you don’t have:
- Kiwi – Try green grapes, starfruit, or thin cucumber slices for similar visual contrast.
- Berries – Frozen berries work in a pinch, but thaw and dry them well first. You can also use cherries or pomegranate seeds.
- Melon – Papaya or dragon fruit offers similar texture with bold colors.
- Mango – Peaches or nectarines are excellent stand-ins during stone fruit season.
- Mint – Basil or lemon balm also works for garnish.
For added texture or crunch, feel free to toss in toasted coconut, crushed pistachios, or candied nuts.
And if you’re looking to make this platter diabetic- or keto-friendly, lean on lower-sugar fruits like berries, melon, or avocado slices and skip the sugary dips.
Best Side Dishes of Pretty Fruit Platter
To turn your fruit platter into more than just a snack tray, pair it with complementary sides that bring in richness, crunch, or savoriness:
1. Mini Croissant Sandwiches
Savory little bites filled with ham, cheese, or egg salad provide a delicious contrast to the sweet fruit.
2. Yogurt Parfaits
Layer Greek yogurt with granola and honey in cups for a creamy, satisfying side.
3. Cheese and Crackers Board
A mild cheese like brie or gouda pairs beautifully with fruit—especially when served with crackers and a touch of fig jam.
Serving and Presentation Tips
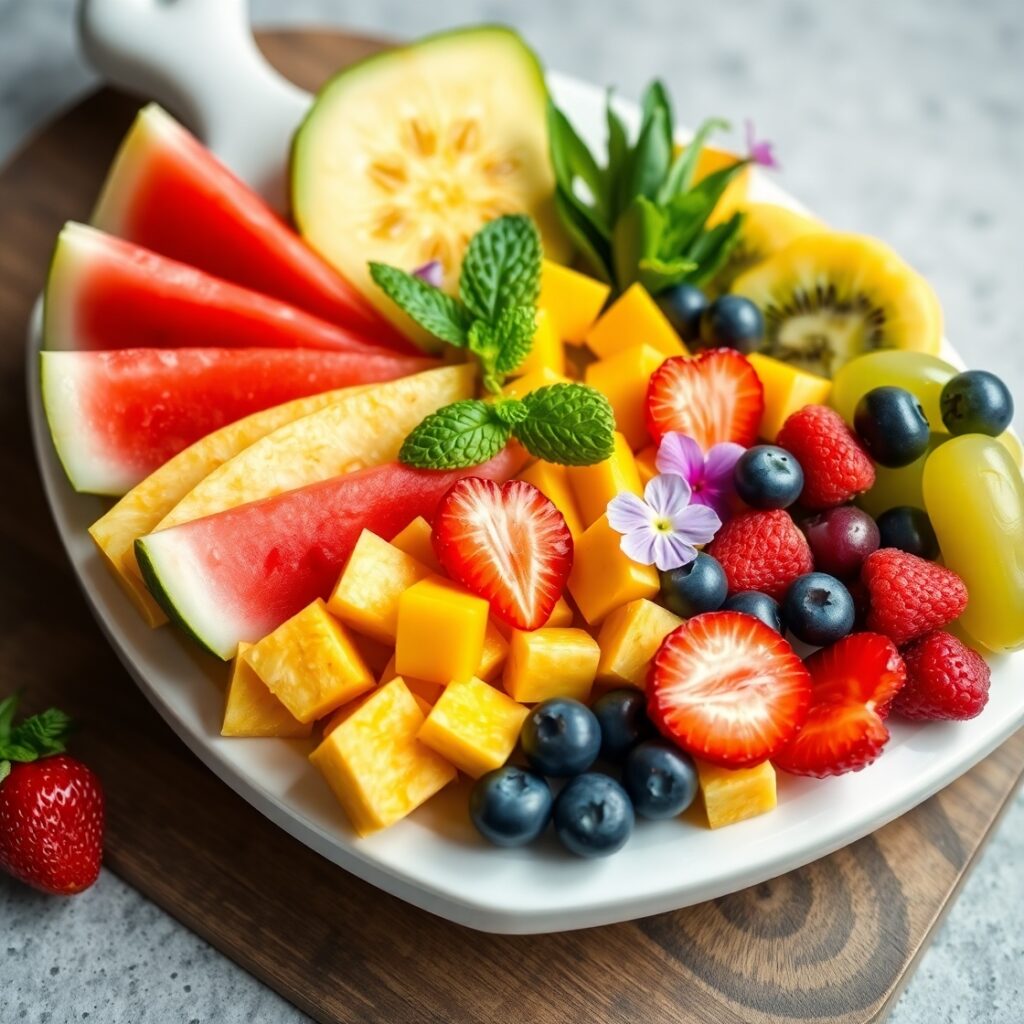
Presentation is everything when it comes to a Pretty Fruit Platter. The goal is to make the fruit look like a luxurious centerpiece—abundant, colorful, and carefully arranged, but still natural and inviting.
Here are some of my go-to tips:
- Use a large platter or board: Opt for a wide surface with a bit of a border to keep everything contained. Wooden boards give a rustic feel, while white ceramic or slate lends a modern, clean look.
- Layer fruits by size: Start with your largest fruit pieces first to anchor the layout, then layer medium-sized fruit, and finally fill gaps with smaller berries or grapes.
- Think in color blocks: Place like-colored fruits near each other in flowing sections rather than scattering them. This keeps the eye moving and prevents a chaotic look.
- Use symmetry when in doubt: If you’re struggling with layout, go for a mirrored arrangement from the center outward.
- Add height and texture: Layering fruit slightly on top of one another adds volume. Use slices of citrus to “lift” smaller berries or scatter mint leaves to create visual dimension.
Tips and Tricks to Make This Recipe Better
Want to make your fruit platter Instagram-worthy without spending hours arranging slices? These tips will make your platter shine with minimal effort.
- Chill your fruit before assembling: Cold fruit holds its shape better and stays fresh longer once served.
- Dry fruit completely: Use paper towels to remove excess moisture—wet fruit not only looks less appealing but can slip around or leak juices onto the board.
- Use a variety of shapes: Fans, wedges, balls, cubes—mixing textures and angles keeps the eye engaged.
- Stick to odd numbers: Groups of 3 or 5 of the same fruit tend to look more organic and less staged.
- Include a dip or sauce: Even just a little bowl of vanilla yogurt or honey elevates the platter from snack to something special.
- Garnish last: Add mint leaves or edible flowers only once your fruit is in place so they don’t get squashed.
Common Mistakes to Avoid
Even though this recipe is simple, a few missteps can make the platter less effective:
- Overcrowding the board: Trying to fit too much on a small surface will make it look messy. Allow fruit to breathe.
- Using under-ripe or overripe fruit: Not only does this affect taste, but it can also make the platter look dull or mushy.
- Poor knife work: Uneven slices or jagged edges take away from the polish. Use a sharp knife and take your time.
- Letting fruit sit too long: Assemble your platter no more than 2–3 hours ahead, and always store it covered in the fridge.
- Ignoring color balance: Too much of one color (like red berries) can make the platter feel flat. Aim for a rainbow.
How to Store It
If you have leftovers (or want to prepare in advance), here’s how to keep your fruit platter fresh:
- Pre-cut fruit: Store each type in separate airtight containers lined with paper towels to absorb moisture. Refrigerate up to 2–3 days.
- Assembled platter: Cover tightly with plastic wrap and refrigerate. If you’re including delicate elements like mint or edible flowers, add those just before serving.
- Don’t freeze: Most fresh fruit doesn’t freeze and thaw well for presentation—it becomes mushy and loses structure.
- Refresh leftovers: Before serving again, discard any fruit that looks wilted and top up with fresh slices.
FAQ
Q1: Can I make this fruit platter a day in advance?
You can prep the fruit ahead, but assemble it the day you plan to serve for the best freshness and texture.
Q2: What are the best fruits for winter platters?
Try citrus (oranges, mandarins, grapefruit), apples, pears, pomegranate seeds, and kiwi for a festive seasonal look.
Q3: Can I include dried fruits?
Yes—dried apricots, dates, or figs offer contrast and chewiness. Just don’t overdo it, as they’re denser than fresh fruit.
Q4: What’s a good vegan dip for a fruit platter?
Coconut yogurt with maple syrup and a splash of vanilla makes a perfect creamy dip.
Q5: How big should the platter be for a party of 10?
A large cutting board or 16×12-inch tray should comfortably hold enough fruit for 10 guests, especially if other food is being served.

Pretty Fruit Platter Recipe
- Total Time: 30 minutes
- Yield: Serves 8-10
- Diet: Vegetarian
Description
A colorful, crowd-pleasing Pretty Fruit Platter that turns fresh produce into edible art. With no cooking required, this recipe is the perfect way to celebrate the natural beauty and flavor of seasonal fruits. It’s ideal for brunch, parties, or even a light dessert—and it can be scaled up or down easily. Customize it with your favorite fruits, dips, and garnishes to suit any occasion. With a little planning and a creative eye, you can make this vibrant platter the stunning centerpiece of your table.
Ingredients
1 small seedless watermelon
1/2 pineapple
1 cantaloupe or honeydew melon
1 mango
1 cup strawberries
2 kiwis
1 cup red grapes
1 cup green grapes
1/2 cup blueberries
1/2 cup raspberries
Fresh mint leaves (for garnish)
Optional: Edible flowers, yogurt dip, honey
Instructions
- Wash and dry all fruit thoroughly.
- Cut larger fruits like watermelon and melon into cubes, triangles, or scoops.
- Slice pineapple into spears or rounds; mango into fans or cubes.
- Halve strawberries and slice kiwi into rounds.
- Arrange larger fruits first on a large board or platter.
- Layer in medium fruits like kiwi and strawberries.
- Fill gaps with berries and grapes.
- Add fresh mint leaves and edible flowers as garnish.
- Place small bowls of dip or honey along the edge of the board.
Notes
Chill fruit before slicing for clean edges.
For extra flavor, dust pineapple or mango with chili-lime seasoning.
Swap based on seasonal fruit—this recipe is highly customizable.
- Prep Time: 30 minutes
- Cook Time: 0 minutes
- Category: Snack / Appetizer
- Method: No -cook
- Cuisine: Global
Nutrition
- Serving Size: 1 generous portion
- Calories: 105