
There’s something timeless and deeply comforting about an icebox cake. Maybe it’s the ease, the nostalgia, or the cool creaminess that makes every bite feel like a retreat from the summer heat.
My first brush with this classic dessert came unexpectedly—during a family road trip, when my aunt in Mississippi opened her freezer and served us a layered wonder of whipped cream and graham crackers chilled to perfection. It was humble, unfussy, and utterly delicious. That moment stuck with me—how something so simple could steal the show.
This recipe was born from the need for a no-bake dessert that could be made ahead of time but didn’t sacrifice flavor or texture. Whether it’s for Sunday dinner, a summer BBQ, or just a midweek treat, this icebox cake delivers every single time.
If you’re someone who doesn’t want to deal with hot ovens or complicated steps but still craves that “wow” moment on the dessert table—read on. You’re about to discover why this classic should never go out of style.
Why I Love This Recipe
What makes an icebox cake so universally loved? First, it’s the simplicity.
You don’t need to be a trained pastry chef to get it right. You just need a handful of pantry staples and a little patience as it chills.
Unlike many desserts that demand exact temperatures and perfect timing, icebox cakes are forgiving. You layer cookies or graham crackers with whipped cream, custard, or pudding, then let the fridge do the work—softening those layers into a lush, sliceable dream.
It’s also incredibly versatile. You can adapt it for nearly any season or flavor preference—strawberries in spring, pumpkin in fall, peppermint in winter. That makes it not just a one-hit wonder but a year-round hero.
And best of all? It’s kid-approved and grown-up-adored. You can assemble it with little hands helping in the kitchen, and yet, when plated well, it still feels elegant enough for dinner parties.
No stress. No oven. No regrets.
Ingredients for Icebox Cake
Let’s walk through the base ingredients needed for a classic version of the icebox cake—this one highlights vanilla whipped cream and graham crackers, with optional layers of fruit or chocolate.
For the whipped cream filling:
- Heavy whipping cream (at least 36% fat): This is what gives the cake its rich, cloud-like texture.
- Powdered sugar: Adds sweetness without a grainy texture.
- Vanilla extract: Use real vanilla if possible—it makes a huge difference in flavor.
For the layers:
- Graham crackers: These soften perfectly in the fridge and hold up well. Chocolate wafers or ladyfingers also work, depending on your style.
- Fresh berries (optional): Strawberries, blueberries, or raspberries can add a burst of freshness.
- Chocolate shavings or cocoa powder (optional): For garnish or to create a chocolate-vanilla combo.
Optional extras for variations:
- Instant pudding (vanilla or chocolate): Adds an extra layer of creamy richness.
- Cream cheese: For those who like a slightly tangier, denser filling.
- Sweetened condensed milk: Adds body and sweetness for a custard-like layer.
You don’t need all of these—just decide which variation you’re going for and stick to a few components that complement each other.
How Much Time Will You Need?
This is one of the major selling points of an icebox cake—it takes minimal hands-on time.
Preparation Time: 20–30 minutes
Chilling Time: At least 6 hours (preferably overnight)
Total Time: About 6.5–8 hours
You can prep it in the morning and forget about it until dessert time, or build it the night before for maximum ease.
How to Make This Icebox Cake

Here’s the full step-by-step breakdown so you know exactly what to do at every stage:
Step – 1: Whip the Cream
In a large mixing bowl, add the cold heavy cream, powdered sugar, and vanilla extract. Using a hand mixer or stand mixer, beat on medium-high until stiff peaks form. This should take about 3–4 minutes.
The whipped cream should hold its shape but still look soft and creamy. Don’t overbeat it—it should not look grainy or start to separate.
Step – 2: Choose Your Dish
Use a 9×9-inch square baking dish or a loaf pan lined with parchment for a more sculpted presentation.
Glass pans are great if you want to showcase the layers from the side.
Step – 3: Layer the Base
Start by laying a single layer of graham crackers on the bottom of the dish. You may need to break a few to cover the entire surface.
Spread a generous layer of whipped cream over the crackers, about 1/3 to 1/2 inch thick.
If using fruit or pudding, now’s the time to layer that in, pressing lightly to ensure everything sticks together.
Step – 4: Repeat the Layers
Add another layer of crackers, followed by whipped cream. Repeat this process 3 to 4 times until your dish is full or your ingredients run out—ending with a top layer of whipped cream.
Smooth the top layer carefully with an offset spatula for a clean, finished look.
Step – 5: Add Finishing Touches
Sprinkle chocolate shavings, a dusting of cocoa powder, or a few sliced berries on top.
If using a loaf pan, you can chill it and then invert it onto a serving plate, removing the parchment and adding toppings right before serving.
Step – 6: Chill
Cover tightly with plastic wrap or a lid. Chill in the refrigerator for at least 6 hours or preferably overnight. This is where the magic happens—the cream softens the graham crackers, turning them into cake-like layers.
6. Substitutions
The beauty of an icebox cake lies in its flexibility. Here are some simple swaps you can make without compromising texture or flavor:
Graham crackers → Chocolate wafers or digestive biscuits
For a richer, chocolatey flavor or a more rustic, British-style version.
Heavy cream → Coconut cream
For a dairy-free or vegan option, chilled coconut cream whips up beautifully. Just make sure to use full-fat canned coconut milk and chill it overnight before whipping.
Powdered sugar → Maple syrup or honey
Natural sweeteners can be used in moderation. Be careful not to thin the cream too much—whip it fully before folding in syrups.
Vanilla extract → Almond extract or citrus zest
A few drops of almond extract or a bit of lemon zest can completely change the flavor profile—great for customizing for different occasions.
Fresh fruit → Fruit preserves
If you’re out of berries, use a thin layer of strawberry jam or lemon curd between the whipped layers for a fruity kick.
Best Side Dishes of Icebox Cake
Though icebox cake stands strong on its own, pairing it with light, contrasting side dishes can elevate the experience.
1. Fresh Fruit Salad
A colorful medley of melon, kiwi, grapes, and berries offers a crisp, juicy counterbalance to the creamy richness of the cake.
2. Iced Coffee or Cold Brew
Pairing a chilled dessert with a strong, cold coffee creates a refreshing contrast in temperature and flavor.
3. Lemon Sorbet
The tartness of sorbet acts as a palate cleanser, making each bite of cake taste even more indulgent.
Serving and Presentation Tips

When it comes to presenting your icebox cake, less is more—but clean, intentional touches can turn a simple dessert into a centerpiece.
Use a clean slice.
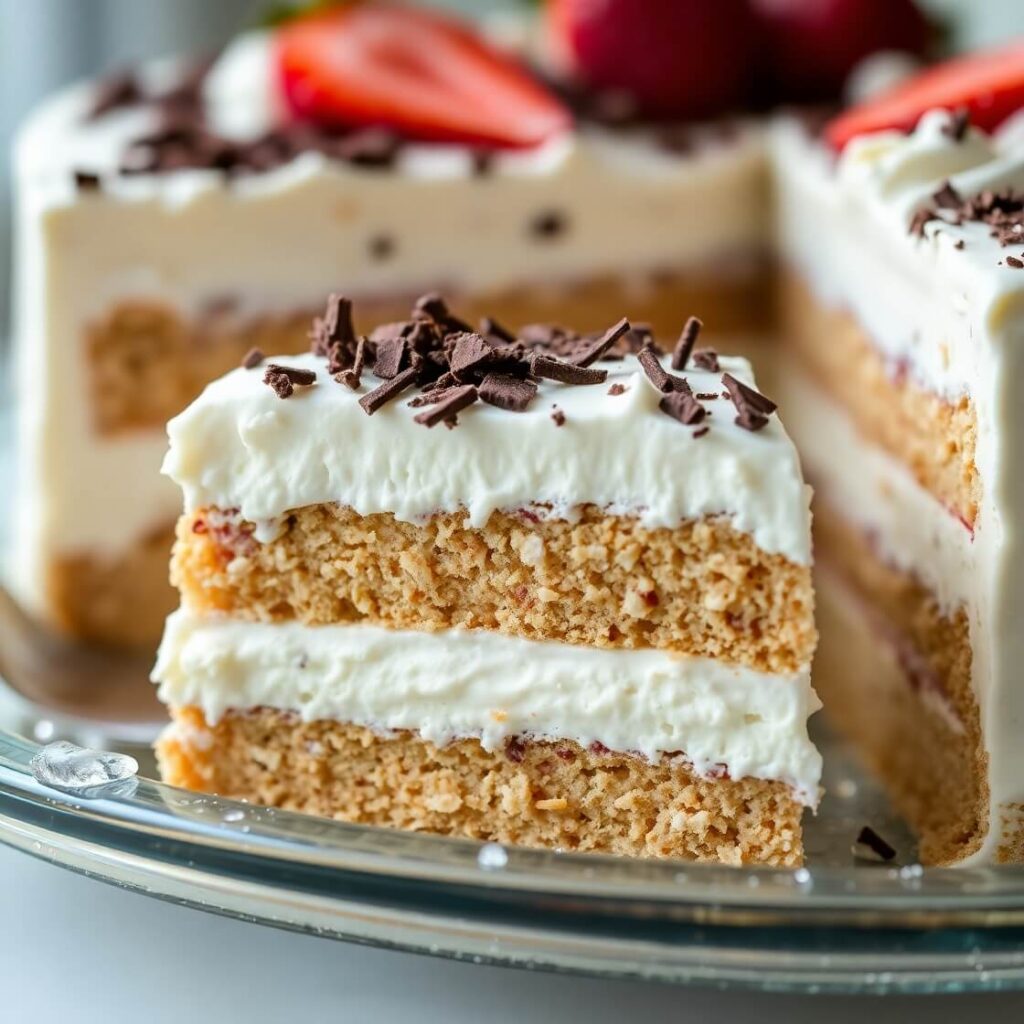
Dip a sharp knife in hot water and wipe it clean between each slice for sharp, bakery-style cuts. This reveals the distinct layers of cream and cracker—always a visual win.
Top with intention.
Finish the cake with a light sprinkle of finely grated chocolate, a ring of fresh berries, or a swirl of fruit coulis. If you’re serving in a clear dish, let the layered sides do the talking—no need to overdecorate.
Garnish just before serving.
Keep toppings like mint leaves or fresh fruit chilled and add them right before presenting. This keeps everything looking fresh and vibrant, especially if the cake has been chilling overnight.
Elevate with a pedestal or glass platter.
Presentation makes a difference—choose a cake stand, a white ceramic platter, or even individual parfait glasses for a mini version.
Tips and Tricks to Make This Recipe Better
Want a dessert that tastes like it came from a bakery—but you barely touched the oven? This is how you take your icebox cake from good to exceptional.
- Whip to soft, not stiff peaks if you’re layering over many hours. This helps the cream settle evenly and soak into the cracker layers smoothly.
- Layer lightly but evenly. Overloading each layer can make the cake collapse or weep. Think of the whipped cream as the mortar that binds everything gently.
- Chill your bowl and beaters before whipping the cream—this helps you reach perfect peaks faster.
- Make it the night before. The magic of the icebox cake is in the wait. Letting it sit overnight ensures every layer melds into a soft, spoonable texture.
- Add a pinch of salt. Just a small pinch in your whipped cream can enhance the sweetness and depth of flavor.
Common Mistakes to Avoid
Even with such a forgiving recipe, a few missteps can lead to a less-than-stellar result.
- Don’t under-whip the cream. If it’s too soft, your layers will slump and the cake won’t hold shape when sliced.
- Avoid soggy fruit. If using fresh berries, dry them well. Wet fruit can introduce too much moisture and turn your layers watery.
- Don’t rush the chilling. Six hours is the absolute minimum. Any less and the graham crackers won’t fully soften, resulting in a crunchy—not cakey—texture.
- Layer too thick? It won’t slice cleanly. Even, thin layers lead to better flavor distribution and structure.
- Using the wrong cream. Always go for heavy cream with at least 36% fat. Anything lower won’t whip properly.
How to Store It
An icebox cake is perfect for make-ahead situations, but it stores best under the right conditions.
- Refrigerator Storage: Keep tightly wrapped in plastic or stored in an airtight container. It will keep well for up to 3–4 days. After that, the texture becomes too soft and watery.
- Freezer Option: You can freeze it for up to 1 month. To do so, wrap tightly in plastic wrap and then foil. Thaw in the refrigerator overnight before serving.
- Avoid warm environments. Once out of the fridge, serve immediately. Because of the whipped cream, it will begin to soften and melt if left out too long.
FAQ
Q1: Can I use Cool Whip instead of homemade whipped cream?
Yes, you can substitute Cool Whip in a 1:1 ratio. It holds up a bit longer in warm temperatures, making it good for potlucks.
Q2: Can I make this with chocolate pudding instead of whipped cream?
Absolutely. A layer of chocolate or vanilla pudding between the graham crackers adds richness. You can also mix it with whipped cream for a hybrid version.
Q3: What’s the best way to make it dairy-free?
Use chilled, full-fat coconut cream instead of heavy cream and ensure your cookies or crackers are dairy-free. Sweeten with maple syrup or agave if needed.
Q4: Can I add nuts to the layers?
Yes, chopped toasted pecans, almonds, or hazelnuts make a lovely crunchy contrast. Just keep the pieces small so they don’t affect slicing.
Q5: How do I transport it to a party?
Use a deep dish with a secure lid. Keep it refrigerated until right before leaving, and bring a small cooler with ice packs if it’ll be out longer than 30 minutes.

Icebox Cake Recipes
- Total Time: 6.5–8 hours (includes chilling)
- Yield: 8 servings
- Diet: Vegetarian
Description
This icebox cake is everything you want in a summer dessert: creamy, layered, and chilled to perfection—without ever turning on the oven. It layers whipped cream, graham crackers, and optional fruit or chocolate for a cool treat that’s easy to customize and impossible to mess up. Make it ahead and serve it chilled—just slice and enjoy!
Ingredients
- 3 cups heavy whipping cream (chilled)
- 1/3 cup powdered sugar
- 1 ½ tsp vanilla extract
- 1 box graham crackers (approx. 18 sheets)
- 1 ½ cups fresh strawberries or berries (optional)
- 2 tbsp chocolate shavings or cocoa powder (optional)
Instructions
- In a large chilled bowl, whip cream, powdered sugar, and vanilla until stiff peaks form.
- Spread a thin layer of whipped cream at the bottom of a 9×9-inch pan.
- Add a layer of graham crackers, breaking to fit as needed.
- Spread another layer of whipped cream evenly over crackers.
- Add berries if using.
- Repeat layers 3–4 times, ending with whipped cream on top.
- Smooth top and garnish with chocolate or fruit.
- Cover and refrigerate for at least 6 hours or overnight.
- Slice with a warm knife and serve chilled.
Notes
For a richer version, mix softened cream cheese into the whipped cream.
To make individual servings, layer ingredients in mason jars or parfait glasses.
For a chocolate version, swap half the cream for chocolate pudding.
- Prep Time: 30 minutes
- Cook Time: 0 minutes
- Category: Dessert
- Method: No -Bake
- Cuisine: American
Nutrition
- Serving Size: 1 slice
- Calories: 375